|
The information contained in this document is intended for the sole use of Canadian Challenger owners and is strictly proprietary and confidential.
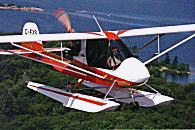
We strongly recommend that you keep an aircraft log. This log should track airframe and engine hours as well as all maintenance performed on the aircraft or engine. A well maintained aircraft with documented maintenance will also greatly enhance resale value. Keep all inspection reports with your aircraft log. Enclosed is a copy of our inspection report. This is an extremely important document that we have developed through years of experience with the airplane. The Challenger you have received is an excellent aircraft, well proven, easy to fly and built to high standards at the factory, however it will only stay that way if you maintain it properly. Remember that this is an aircraft, not a car, boat or other RV. Always use AN type (aircraft specification) hardware only on your Challenger. Do not reuse nyloc nuts or cotter pins. Ensure that at least one thread protrudes through nyloc nuts for secure attachment. Do not overtighten fasteners. Use only castle nuts and cotter pins on rotating parts. Where locking type fasteners can not be used, use Loctite on the threads of fasteners. Use only stainless steel rivets for all structural applications. If you need Challenger parts, they are sold directly by Quad City Aircraft. Call 1-309-764-3515. Engine parts are available from Rotax or one of their regional service centers. Contact Rotax Research Canada Ltd., 6235 Okanagan Landing Road, Vernon, BC V1H 1M5. Phone 250-260-6299. It is very important that you regularly lubricate all the cables as outlined in the 50 hour inspection sheet, particularly the rudder as it is flight critical and especially before operating in potentially freezing conditions. Over time, moisture will build up in the cable casings, particularly when the plane has been exposed to humid situations such as on floats. There have been rare instances where unserviced cables operate normally on the ground only to freeze up at altitude when exposed to freezing temperatures aloft in the fall or winter. WD-40 is the preferred lubricant as it will displace water and yet is not oily, so will not retain dirt and grit. Spray it liberally into the rudder cable casings from the cockpit with the tail wheel on the ground so that the lubricant is flowing downhill. Items of importance include checking and adjustment of the tension on the 503 fan belt after break-in and every 50 hours. Not doing so could result in overheating or seizure. Also check the state of the carb needle and clip every 50 hours. The clip can wear the needle and if left unserviced, the needle will eventually break, block the jet and cause a power failure. When reinstalling the needle/clip assembly, ensure that the clip is below the plastic slide. These engines are simple to work with and inexpensive to overhaul. Rotax recommends overhauling every 300 hours. Historically many owners of the newer dual ignition 503s have done a top overhaul (new pistons and rings) every 250-300 hours and a full overhaul around 500-600 hours. When the engine is first started, it should be left to run at idle for several minutes before slowly adding a little RPM. Experts suggest that by warming up a total of 8 minutes, summer or winter, piston life can be doubled or even tripled. Engines that are not warmed carefully will likely require a piston change at about 250 to 300 hours. As hours accumulate, the various pivot and attach points in the elevator linkage will become loose and require adjusting to remove the slack. If too much play accumulates, mild elevator flutter will result if a combination of high speed and trim adjusted for hands off flight exists. If you encounter this in flight, immediately decrease the throttle and pull back on the stick to slow down. Replacing the elevator pins with AN drilled shank bolts, castle nuts and cotter pins, done up tight enough to add a little friction, will keep the free play from developing into a flutter. Ensure that the shank of the bolt, not the threads (which could cut) bears on the actual hinge. You can also deflect one elevator upwards slightly with the other slightly downwards by adjusting the push rods to achieve a difference of four degrees. That will load both sides in flight and eliminate free play and flutter. These fixes don't preclude proper periodic adjustment. Be aware that some items on the Challenger have a specified useful life and should be replaced periodically. Particularly important are the rudder cables which should be replaced around 400 hours. It is not necessary to replace the casings, only the cables. Use only aircraft stainless cable of the same diameter. The top reduction pulley bearings will need occasional replacement, particularly if the belt tension has been overly tight. Check for play by pushing the prop tip fore and aft, and rotating the prop with the belt removed. The Rotax rubber carburetor intake sockets will crack in time and should be replaced annually. The cog belt should be replaced every 100 hours or each year unless it is the GT-2 version which should be replaced every 200 hours or two years. Other items like the rubber motor mounts and Rotax 503 fan belts should be changed as needed. Exhaust springs should be periodically replaced and lock wired in place so that if one should fail, the pieces will not damage the propeller. Make sure that there is a little slack in the lock wire as it is much harder than the tangs on the muffler and will cut through them if drawn tight. Remember that this is a 'pusher' aircraft. Make sure that all items which could become loose are secured with aircraft quality lock wire or Loctite. This includes the air filter. Lock wire, lock wire pliers (available at most aircraft supply houses) and Loctite, a liquid locking compound placed on bolt threads before assembly and available in varying strengths (available in good auto parts stores) are important items in your tool box. Do not develop the habit of using the aileron gap as a tray for tools while working on the engine. Sooner or later you will forget to remove them and your propeller will suffer the consequences. Propeller balance should be checked occasionally. Aftermarket supply houses offer inexpensive balancers. Use clear spray varnish on the lighter blade to balance. Always use lots of water and a soft cloth when cleaning your Lexan enclosure. Wiping it when dry is sure to leave scratches. One of the great advantages of our aircraft is that it is very easy to do a really thorough inspection, without spending all kinds of time opening up inspection hatches, removing fairings, engine cowlings and the like. It doesn't take long to perform, nor does it require an expensive mechanic. You should take a couple of hours to go through every item on the inspection sheet once every 50 hours or once every other month, which ever comes first. You may want to personalize your inspection sheet by adding additional items if, for example you have added special equipment such as floats or skis. Being able to inexpensively do your own maintenance necessitates that you adopt the same professional attitude to maintenance as an aircraft mechanic. Don't let this privilege lead to mediocrity. If you don't feel willing or qualified to perform some or all of the maintenance (most involves straightforward inspections and simple adjustments), competent mechanical help can be found just about anywhere.
To learn and see more order our comprehensive information package and video! |